Overview
Tavern is a teamserver for Realm, providing a UI to control deployments and implants during an engagement. The majority of Tavern’s functionality is exposed through a GraphQL API, which is used by both implants and the UI.
If you would like to help contribute to Tavern, please take a look at our open issues.
Deployment
This section will walk you through deploying a production-ready instance of Tavern to GCP. If you’re just looking to play around with Tavern, feel free to run the docker image (spellshift/tavern:latest) locally.
1. Create a GCP Project
Navigate to the GCP Console and create a new GCP project.
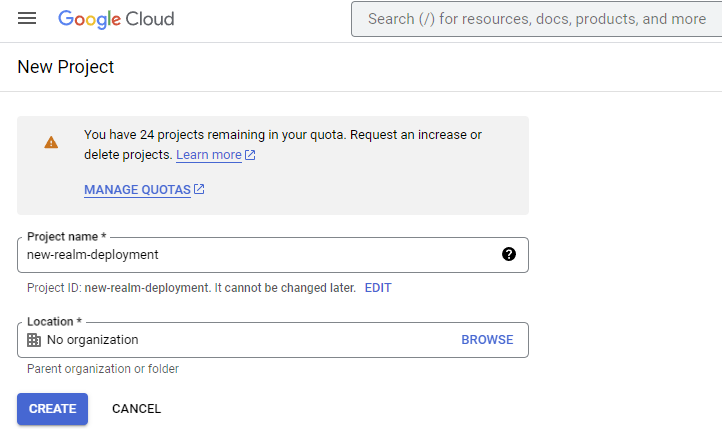
Make a note of the created Project ID as you’ll need that in a later step
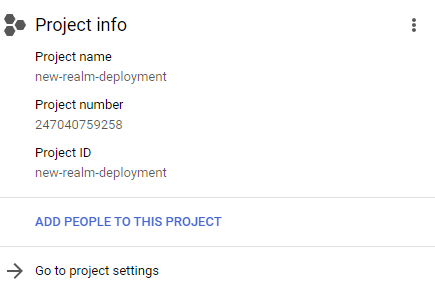
2. Setup OAuth (Optional)
Note: These setup instructions assume you own a domain which you would like to host Tavern at.
If you want to configure OAuth for your Tavern Deployment, navigate to the GCP OAuth Consent Screen and create a new External consent flow. If you do not configure OAuth, Tavern will not perform any authentication or authorization for requests.
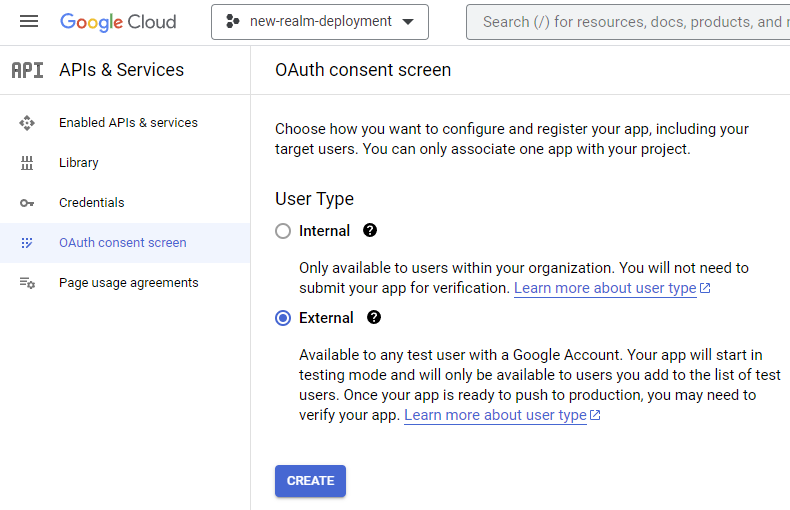
Provide details that users will see when logging into Tavern, for example:
- App Name: “Tavern”
- User Support Email: “[email protected]”
- App Logo: Upload something cool if you’d like, but then you’ll need to complete a verification process.
- App Domain: “https://tavern.mydomain.com/”
- Authorized Domains: “mydomain.com”
- Developer Contact Information: “[email protected]”
Add the “…/auth/userinfo.profile” scope, used by Tavern to obtain user names and photourls.
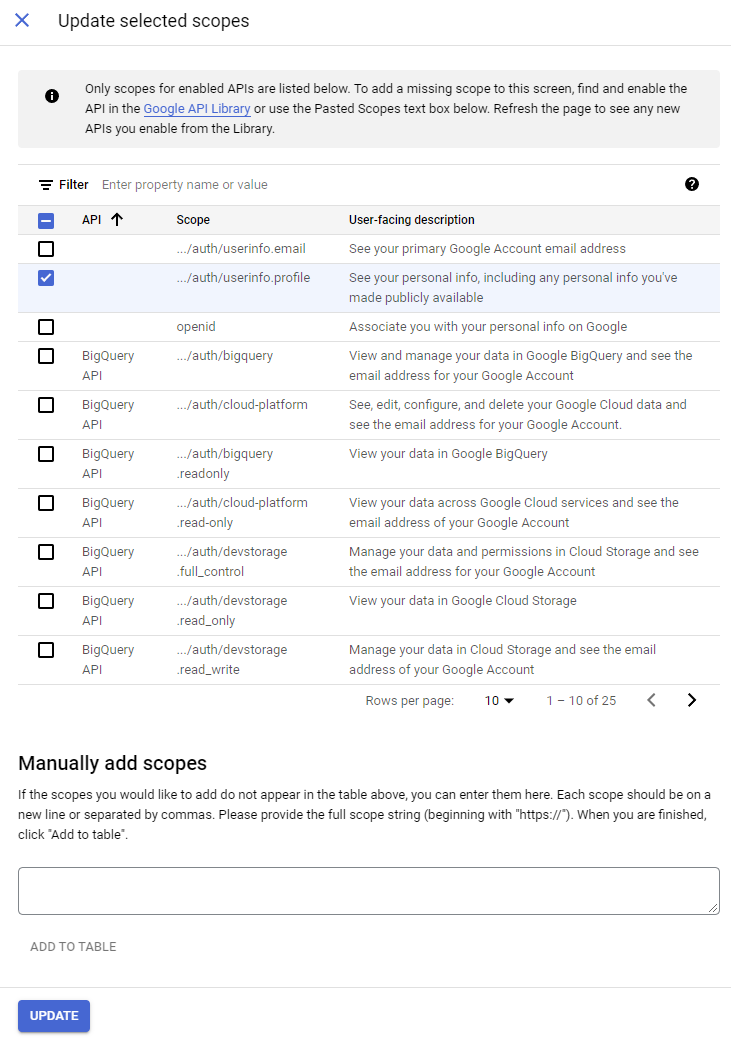
Next, add yourself as a “Test User”. Until you publish your app, only test users may complete the OAuth consent flow. If you didn’t select any options that require verification, you may publish your app now (so you won’t need to allowlist the users for your application).
Navigate to the Credentials Tool and select “Create Credentials” -> “OAuth client ID”. Be sure to add an “Authorized redirect URI” so that the consent flow redirects to the appropriate Tavern endpoint. For example “mydomain.com/oauth/authorize”. Save the resulting Client ID and Client secret for later.
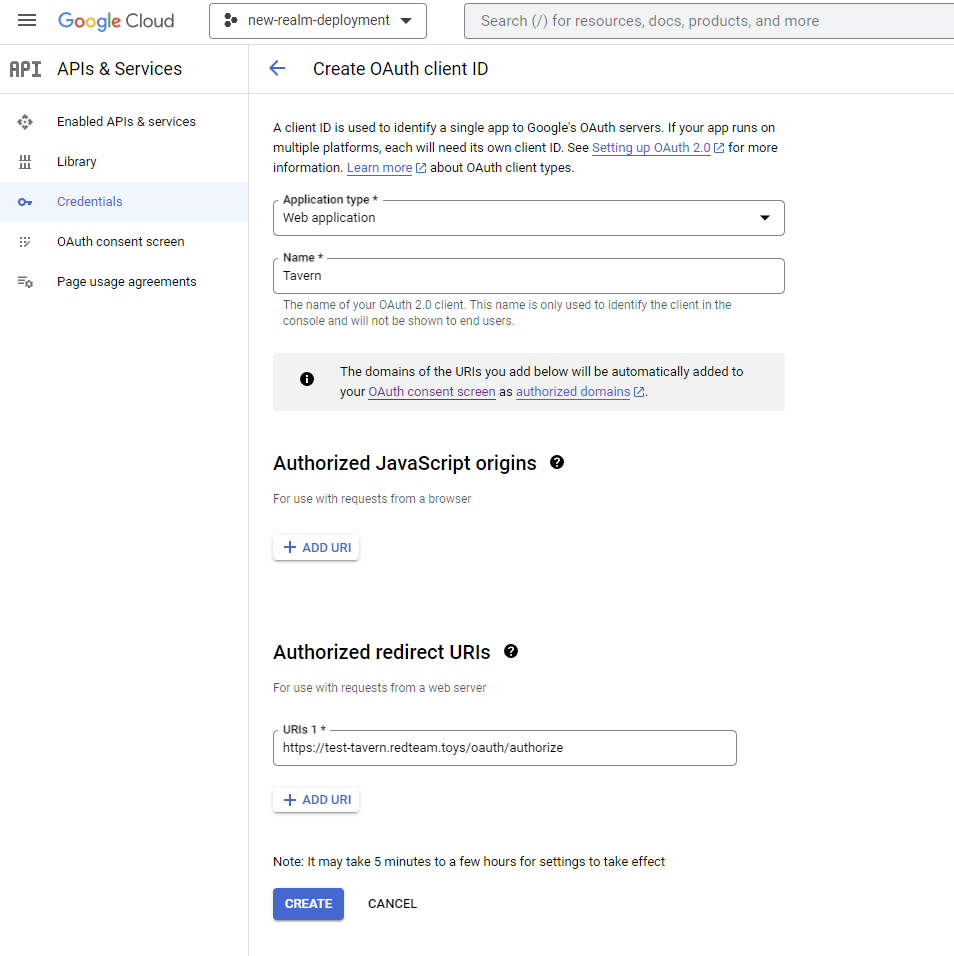
Next, configure a CNAME record for the domain you’d like to host Tavern at (e.g. “tavern.mydomain.com”) to point to “ghs.googlehosted.com.”.

And that’s it! In the below sections on deployment, please ensure you properly configure your OAUTH_CLIENT_ID, OAUTH_CLIENT_SECRET, and OAUTH_DOMAIN to ensure Tavern is properly configured.
3. Google Cloud CLI
Follow these instructions to install the gcloud CLI. This will enable you to quickly obtain credentials that terraform will use to authenticate. Alternatively, you may create a service account (with appropriate permissions) and obtain Application Default Credentials for it. See these Authentication Instructions for more information on how to configure GCP authentication for Terraform.
After installing the gcloud CLI, run gcloud auth application-default login to obtain Application Default Credentials.
4. Terraform
- Follow these instructions to install the Terraform CLI.
- Clone the repo and navigate to the
terraformdirectory. - Checkout the latest stable release
git checkout -b latest $(git tag | tail -1) - Run
terraform initto install the Google provider for terraform. - Run
terraform apply -var="gcp_project=<PROJECT_ID>" -var="oauth_client_id=<OAUTH_CLIENT_ID>" -var="oauth_client_secret=<OAUTH_CLIENT_SECRET>" -var="oauth_domain=<OAUTH_DOMAIN>" -var="tavern_container_image=$(git tag | tail -1)"to deploy Tavern!
Example:
terraform apply -var="gcp_project=new-realm-deployment" -var="oauth_client_id=12345.apps.googleusercontent.com" -var="oauth_client_secret=ABCDEFG" -var="oauth_domain=test-tavern.redteam.toys" -var="tavern_container_image=$(git tag | tail -1)"
After terraform completes successfully, head to the DNS mappings for Cloud Run and wait for a certificate to successfully provision. This may take a while, so go enjoy a nice cup of coffee ☕
After your certificate has successfully provisioned, it may still take a while (e.g. an hour or two) before you are able to visit Tavern using your custom OAuth Domain (if configured).
CLI Variables
| Name | Required | Description |
|---|---|---|
| gcp_project | Yes | Project ID of the GCP Project created in step 1. |
| gcp_region | No | Region to deploy to. |
| mysql_user | No | The MySQL user to create and connect with. |
| mysql_passwd | No | The MySQL password to set and connect with. Autogenerated by default. |
| mysql_dbname | No | MySQL Database to create and connect to. |
| mysql_tier | No | The type of instance to run the Cloud SQL Database on. |
| oauth_client_id | Only if OAuth is configured | The OAuth ClientID Tavern will use to connect to the IDP (Google). |
| oauth_client_secret | Only if OAuth is configured | The OAuth Client Secret Tavern will use to connect to the IDP (Google). |
| oauth_domain | Only if OAuth is configured | The OAuth Domain that the IDP should redirect to e.g. tavern.mydomain.com (should be the domain you set a CNAME record for while configuring OAuth). |
| min_scale | No | The minimum number of containers to run, if set to 0 you may see cold boot latency. |
| max_scale | No | The maximum number of containers to run. |
| tavern_container_image | No | Override the default tavern image with a custom one. You can use spellshift/tavern:edge to use the latest image. |
Manual Deployment Tips
Below are some deployment gotchas and notes that we try to address with Terraform, but can be a bit tricky if trying to deploy Tavern manually.
- MySQL version 8.0 must be started with the flag
default_authentication_plugin=caching_sha2_passwordfor authentication to work properly. A new user must be created for authentication. - When running in CloudRun, it’s best to connect to CloudSQL via a unix socket (so ensure the
MYSQL_NETenv var is set to “unix” ).- After adding a CloudSQL connection to your CloudRun instance, this unix socket is available at
/cloudsql/<CONNECTION_STRING>(e.g./cloudsql/realm-379301:us-east4:tavern-db).
- After adding a CloudSQL connection to your CloudRun instance, this unix socket is available at
- You must create a new database in your CloudSQL instance before launching Tavern and ensure the
MYSQL_DBenv var is set accordingly.
Redirectors
By default Tavern only supports gRPC connections directly to the server. To enable additional protocols or additional IPs/domain names in your callbacks, utilize Tavern redirectors which receive traffic using a specific protocol (like HTTP/1.1 or DNS) and then forward it to an upstream Tavern server over gRPC.
Available Redirectors
Realm includes three built-in redirector implementations:
grpc- Direct gRPC passthrough redirectorhttp1- HTTP/1.1 to gRPC redirectordns- DNS to gRPC redirector
Basic Usage
List available redirectors:
tavern redirector list
Start a redirector:
tavern redirector --transport <TRANSPORT> --listen <LISTEN_ADDR> <UPSTREAM_GRPC_ADDR>
HTTP/1.1 Redirector
The HTTP/1.1 redirector accepts HTTP/1.1 traffic from agents and forwards it to an upstream gRPC server.
# Start HTTP/1.1 redirector on port 8080
tavern redirector --transport http1 --listen ":8080" localhost:8000
DNS Redirector
The DNS redirector tunnels C2 traffic through DNS queries and responses, providing a covert communication channel. It supports TXT, A, and AAAA record types.
# Start DNS redirector on UDP port 53 for domain c2.example.com
tavern redirector --transport dns --listen "0.0.0.0:53?domain=c2.example.com" localhost:8000

# Support multiple domains
tavern redirector --transport dns --listen "0.0.0.0:53?domain=c2.example.com&domain=backup.example.com" localhost:8000
DNS Configuration Requirements:
- Configure your DNS server to delegate queries for your C2 domain to the redirector IP
- Or run the redirector as your authoritative DNS server for the domain
- Ensure UDP port 53 is accessible
Server Behavior:
- Benign responses: Non-C2 queries to A records return
0.0.0.0instead of NXDOMAIN to avoid breaking recursive DNS lookups (e.g., when using Cloudflare as an intermediary) - Conversation tracking: The server tracks up to 200,000 concurrent conversations
- Timeout management: Conversations timeout after 15 minutes of inactivity (reduced to 5 minutes when at capacity)
- Maximum data size: 50MB per request
See the DNS Transport Configuration section in the Imix user guide for more details on agent-side configuration.
gRPC Redirector
The gRPC redirector provides a passthrough for gRPC traffic, useful for deploying multiple Tavern endpoints or load balancing.
# Start gRPC redirector on port 9000
tavern redirector --transport grpc --listen ":9000" localhost:8000
Configuration
Webserver
By default, Tavern will listen on 0.0.0.0:8000. If you ever wish to change this bind address then simply supply it to the HTTP_LISTEN_ADDR environment variable.
Metrics
By default, Tavern does not export metrics. You may use the below environment configuration variables to enable Prometheus metric collection. These metrics become available at the “/metrics” endpoint configured. These metrics are hosted on a separate HTTP server such that it can be restricted to localhost (default). This is because the endpoint is unauthenticated, and would leak sensitive information if it was accessible.
| Env Var | Description | Default | Required |
|---|---|---|---|
| ENABLE_METRICS | Set to any value to enable the “/metrics” endpoint. | Disabled | No |
| HTTP_METRICS_LISTEN_ADDR | Listen address for the metrics HTTP server, it must be different than the value of HTTP_LISTEN_ADDR. |
127.0.0.1:8000 |
No |
Secrets
By default, Tavern wants to use a GCP KMS for secrets management. The secrets engine is used to generate keypairs when communicating with agents. If you’re running locally make sure to set the secrets manager to a local file path using:
SECRETS_FILE_PATH="/tmp/secrets" go run ./tavern/
MySQL
By default, Tavern operates an in-memory SQLite database. To persist data, a MySQL backend is supported. In order to configure Tavern to use MySQL, the MYSQL_ADDR environment variable must be set to the host[:port] of the database (e.g. 127.0.0.1, mydb.com, or mydb.com:3306). You can reference the mysql.Config for additional information about Tavern’s MySQL configuration.
The following environment variables are currently supported for additional MySQL Configuration:
| Env Var | Description | Default | Required |
|---|---|---|---|
| MYSQL_ADDR | Address of the MySQL server (e.g. host[:port]) |
N/A | Yes |
| MYSQL_NET | Network type (e.g. unix) | tcp | No |
| MYSQL_USER | User to authenticate with | root | No |
| MYSQL_PASSWD | Password to authenticate with | no password | No |
| MYSQL_DB | Name of the database to use | tavern | No |
| MYSQL_MAX_IDLE_CONNS | Integer value of max idle mysql connections to keep open | 10 | No |
| MYSQL_MAX_OPEN_CONNS | Integer value of max mysql connections to open | 100 | No |
| MYSQL_MAX_CONN_LIFETIME | Integer value of max mysql connection lifetime (in seconds) | 3600 | No |
Here is an example of running Tavern locally with a MySQL backend:
MYSQL_USER="admin" MYSQL_ADDR="127.0.0.1:3306" go run ./tavern
When no value is set for MYSQL_ADDR, the default SQLite backend is used:
MYSQL_USER="admin" go run ./tavern/
2022/03/08 05:46:06 no value found for environment var 'MYSQL_ADDR', starting tavern with SQLite
OAuth
By default, user authentication is disabled for Tavern. This means that anyone can login and be granted a session. To restrict who is able to access your deployment, Tavern supports OAuth configuration (using Google OAuth).
To obtain a client_id and a client_secret for Google OAuth, please follow their instructions to create an application.
The following environment variables are required for OAuth Configuration:
| Env Var | Description |
|---|---|
| OAUTH_CLIENT_ID | The OAuth client_id Tavern will use to communicate with an identity provider (Google) |
| OAUTH_CLIENT_SECRET | The OAuth client_secret Tavern will use to authenticate to an identity provider (Google) |
| OAUTH_DOMAIN | The domain Tavern is being hosted at, that the identity provider (Google) should redirect users to after completing the consent flow |
Here is an example of running Tavern locally with OAuth configured:
OAUTH_CLIENT_ID=123 OAUTH_CLIENT_SECRET=456 OAUTH_DOMAIN=127.0.0.1 go run ./tavern
2022/03/09 05:32:58 no value found for environment var 'MYSQL_ADDR', starting tavern with SQLite
2022/03/09 05:32:58 listening on 0.0.0.0:80
When no OAuth configuration is provided, authentication is disabled:
go run ./tavern
2022/03/09 05:24:43 no value found for environment var 'MYSQL_ADDR', starting tavern with SQLite
2022/03/09 05:24:43 WARNING: OAuth is not configured, authentication disabled
When partial OAuth configuration is provided, Tavern will error. This is to protect against inadvertently starting Tavern with authentication disabled.
OAUTH_CLIENT_ID=123 go run ./tavern
2022/03/09 05:31:46 no value found for environment var 'MYSQL_ADDR', starting tavern with SQLite
2022/03/09 05:31:46 [FATAL] To configure OAuth, must provide value for environment var 'OAUTH_CLIENT_SECRET'
exit status 1
How it Works
Tavern hosts two endpoints to support OAuth:
- A login handler (
/oauth/login) which redirects users to Google’s OAuth consent flow- This endpoint sets a JWT cookie for the user, such that the OAuth state parameter can safely be verified later to prevent against CSRF attacks
- Currently the keys used to sign and verify JWTs are generated at server start, meaning if the server is restarted while a user is in the middle of an OAuth flow, it will fail and the user will need to restart the flow
- An authorization handler (
/oauth/authorize) which users are redirected to by Google after completing Google’s OAuth consent flow- This handler is responsible for obtaining a user’s profile information from Google using an OAuth access token, and creates the user’s account if it does not exist yet
Trust on First Use
Tavern supports a Trust on First Use (TOFU) authentication model, meaning the first user to successfully authenticate will be granted admin permissions. Subsequent users that login will have accounts created, but will require activation before they can interact with any Tavern APIs. Only admin users may activate other users.
CLI Application Authentication
Tavern supports access_tokens in place of a session cookie for authentication, intended for use by CLI applications that require authenticated access to the Tavern API. Currently, we only support Golang clients via the provided realm.pub/tavern/cli/auth package. This package relies on the user’s existing browser session (requiring OAuth) to relay authentication credentials (an access_token) to the application. Your CLI package may wish to cache these credentials securely to avoid unnecessary reauthentication. Here is an example of using this package:
package main

import (
 "context"
 "fmt"
 "net/http"
 "time"

 "github.com/pkg/browser"
 "realm.pub/tavern/cli/auth"
)

func main() {
 // Set Timeout (includes time for user login via browser)
 ctx, cancel := context.WithTimeout(context.Background(), 2*time.Minute)
 defer cancel()

 // Setup your Tavern URL (e.g. from env vars)
 tavernURL := "http://127.0.0.1:8000"

 // Configure Browser (uses the default system browser)
 browser := auth.BrowserFunc(browser.OpenURL)

 // Open Browser and Obtain Access Token (via 127.0.0.1 redirect)
 token, err := auth.Authenticate(ctx, browser, tavernURL)
 if err != nil {
  panic(err)
 }

 // Example Tavern HTTP Request
 req, err := http.NewRequest(http.MethodGet, fmt.Sprintf("%s/status", tavernURL), nil)
 if err != nil {
  panic(err)
 }

 // Authenticate Request
 token.Authenticate(req)

 // Send the request etc...
}
If you require authenticated access to the Tavern API outside of Golang, you may implement something similar to what this package does under the hood. THIS IS NOT SUPPORTED. We highly recommend relying on the provided Golang package instead, as our Authentication API may change and cause outages for your application.
Test Data
Running Tavern with the ENABLE_TEST_DATA environment variable set will populate the database with test data. This is useful for UI development, testing, or just interacting with Tavern and seeing how it works.
ENABLE_TEST_DATA=1 go run ./tavern
2023/02/24 01:02:37 [WARN] MySQL is not configured, using SQLite
2023/02/24 01:02:37 [WARN] OAuth is not configured, authentication disabled
2023/02/24 01:02:37 [WARN] Test data is enabled
2023/02/24 01:02:37 Starting HTTP server on 0.0.0.0:80
Default Tomes
Running Tavern with the DISABLE_DEFAULT_TOMES environment variable set will disable uploading the default tomes. This is useful if they are unnecessary, or if you have a custom fork of them available somewhere for import.
DISABLE_DEFAULT_TOMES=1 go run ./tavern
2024/03/02 01:32:22 [WARN] No value for 'HTTP_LISTEN_ADDR' provided, defaulting to 0.0.0.0:8000
2024/03/02 01:32:22 [WARN] MySQL is not configured, using SQLite
2024/03/02 01:32:22 [WARN] OAuth is not configured, authentication disabled
2024/03/02 01:32:22 [WARN] No value for 'DB_MAX_IDLE_CONNS' provided, defaulting to 10
2024/03/02 01:32:22 [WARN] No value for 'DB_MAX_OPEN_CONNS' provided, defaulting to 100
2024/03/02 01:32:22 [WARN] No value for 'DB_MAX_CONN_LIFETIME' provided, defaulting to 3600
2024/03/02 01:32:22 Starting HTTP server on 0.0.0.0:80
PPROF
Running Tavern with the ENABLE_PPROF environment variable set will enable performance profiling information to be collected and accessible. This should never be set for a production deployment as it will be unauthenticated and may provide access to sensitive information, it is intended for development purposes only. Read more on how to use pprof with tavern in the Developer Guide.
Tavern docker image tags explained
Tavern publishes a couple different images.
vX.Y.Zis a semver style version string. Each Realm release creates a git tag and container image .edge&mainare the latest version of tavern in the git repos main branch. These two exist for developers to deploy the latest changes and coerce terraform into deploying upgrades as needed.sha-<hash>represents the specific container per a git commit to main. The hash will match the git commit hash as well this can be verified in the docker build workflow logs.
Build and publish tavern container
If you want to deploy tavern without using the published version you’ll have to build and publish your own container.
Build your container
cd ./realm
docker build --tag tavern:dev --file ./docker/tavern.Dockerfile .
Publish your container to docker hub
If you haven’t before sign-up for a docker hub account and login with the CLI docker login
docker tag tavern:dev <YOUR_DOCKER_HUB_USERNAME>/tavern:dev
docker push <YOUR_DOCKER_HUB_USERNAME>/tavern:dev
Specify your container during terraform deploy
terraform apply -var="gcp_project=<PROJECT_ID>" -var="oauth_client_id=<OAUTH_CLIENT_ID>" -var="oauth_client_secret=<OAUTH_CLIENT_SECRET>" -var="oauth_domain=<OAUTH_DOMAIN>" -var="tavern_container_image=<YOUR_DOCKER_HUB_USERNAME>/tavern:dev"
GraphQL API
Playground
If you’d like to explore the Graph API and try out some queries, head to the /playground endpoint of your Tavern deployment. This endpoint exposes an interactive playground for you to experiment with GraphQL queries. Currently, this is used to fill gaps between developed backend functionality and in-development frontend functionality.
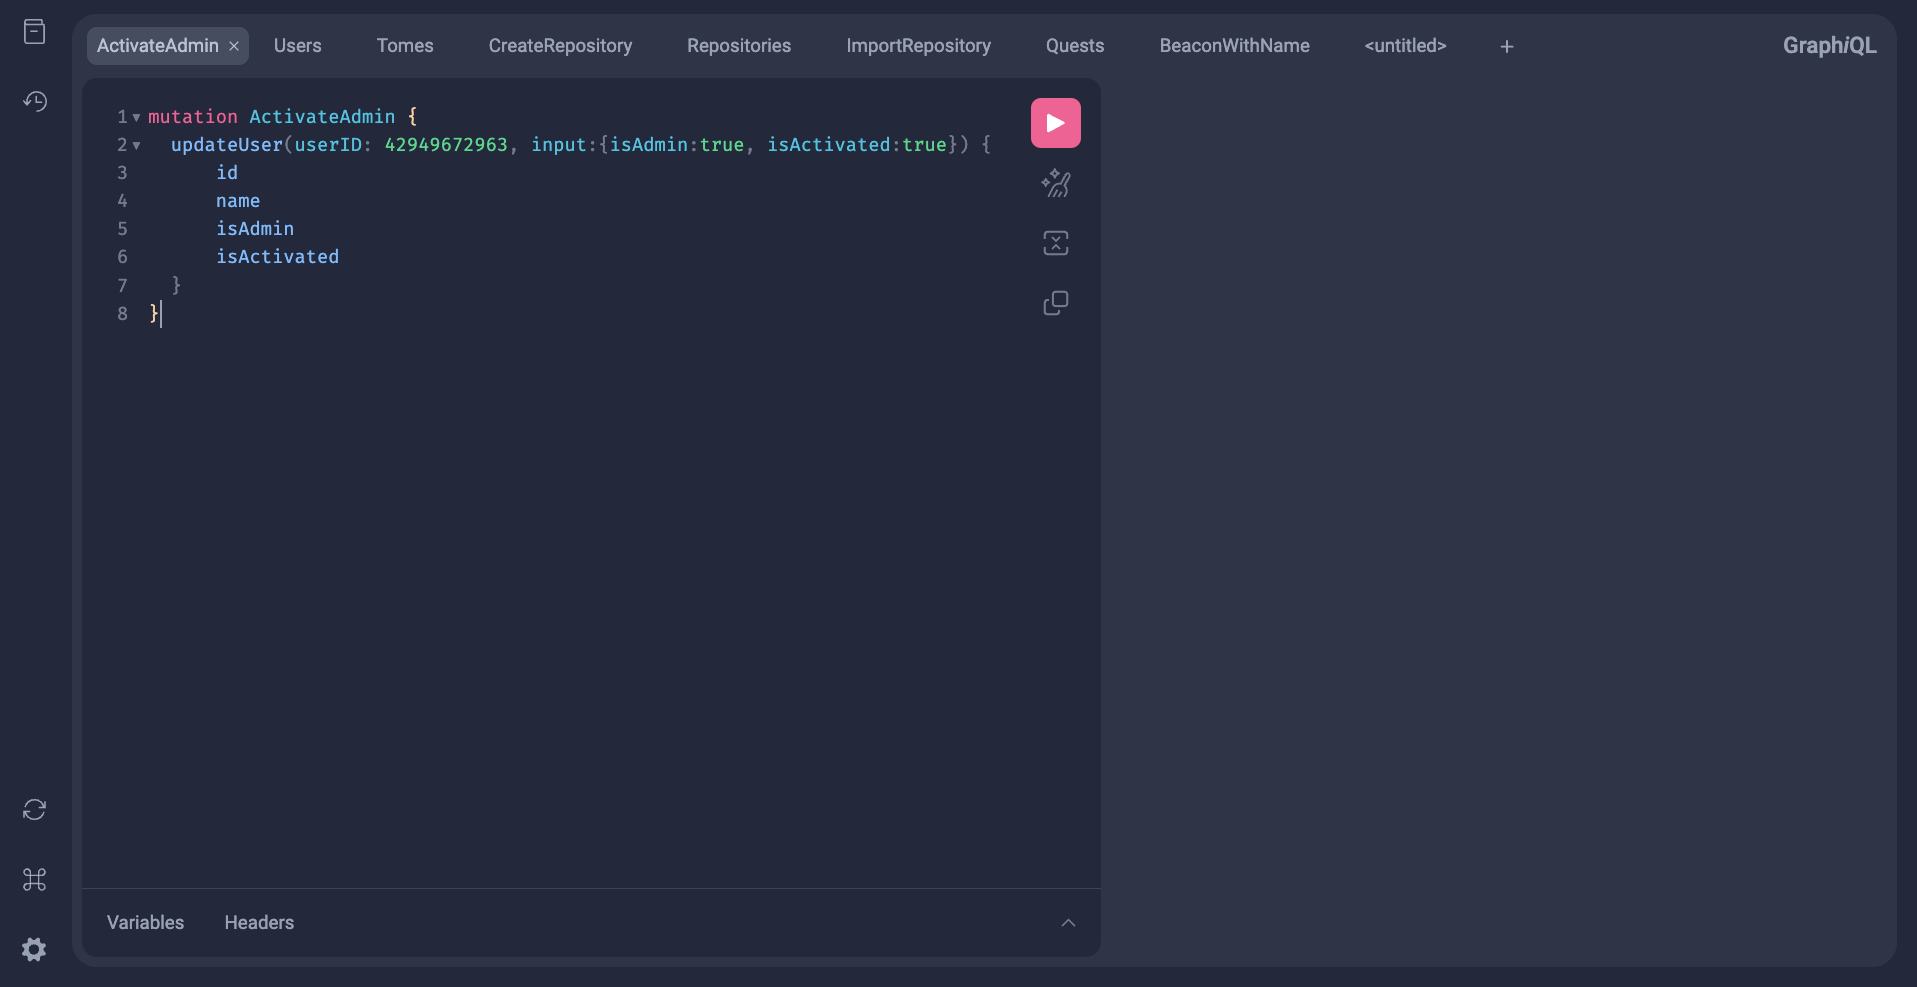
Within the GraphIQL Playground, you’ll be able to access documentation on the various queries and mutations available to you. For example, the updateUser mutation is useful for activating new users and granting admin privileges to others.
List shells
query shells {
  shells {
    edges {
      node {
        id
        beacon {
          id
          host {
            name
          }
        }
      }
    }
  }
}
Create an asset link
mutation tempLink {
  createLink(input: {expiresAt: "2026-02-02T21:33:18Z", assetID: 4}) {
    path
  }
}
List Tomes Example
List information about all available tomes.
query listtomes{
    tomes {
      edges {
        node {
          id
          name
          tactic
          description
          paramDefs
        }
      }
    }
}
List Tomes (Filter) Example
List information about all available tomes which are made for persistence.
query listtomes{
    tomes(where:{tactic: PERSISTENCE}) {
      edges {
        node {
          id
          name
          tactic
          description
          paramDefs
        }
      }
    }
}
CDN HTTP API
Upload - POST /cdn/upload - AUTHENTICATED
The upload API for the Tavern CDN use forms and the POST method. The parameters are fileName and fileContent. and the API will return an Ent ID for the file created. A curl example is shown below:
[$ /tmp] curl --cookie "auth-session=REDACTED" -F "fileName=test_file" -F "fileContent=@/path/to/file" https://example.com/cdn/upload
{"data":{"file":{"id":4}}}%
Create a link - AUTHENTICATED
Once a file’s been uploaded you won’t be able to download it until you create a link for it through the graphql playground /playground
mutation tempLink {
  createLink(input: {expiresAt: "2026-02-02T21:33:18Z", downloadsRemaining: 10, path: "notmalware", assetID: 4}) {
    path
  }
}
This will create a link that allows the link to be active until Feburary 2nd 2026 at 21:33:18 UTC with 10 downloads. These two conditions are or’d so if either is allowed the download will work.
If no path is specified a random 6 character path will be generated. In the graphql query above we request the path back to ensure we know where to grab the file.
Playground - GET /cdn/{path} - UNAUTHENTICATED
The download API is a simple GET request where the fileName provided as part of the upload request(or any File Ent) is appended to the path. Additionally the endpoint is unauthenticated so no cookie is required (and easy to use from Imix!). An example of accessing the API via eldritch is below:
f = http.get(f"https://example.com/cdn/{fileName}", allow_insecure=True)
As these files are stored in the File Ent, they can also be accessed via the asset eldritch library functions.
Feedback
Was this page helpful?
Glad to hear it! Please tell us how we can improve.
Sorry to hear that. Please tell us how we can improve.